WebdriverIO XML Reporter
========================
> A WebdriverIO reporter that creates [Jenkins](http://jenkins-ci.org/) compatible XML based JUnit reports
## Installation
The easiest way is to keep `@wdio/junit-reporter` as a devDependency in your `package.json`, via:
```sh
npm install @wdio/junit-reporter --save-dev
```
Instructions on how to install `WebdriverIO` can be found [here](https://webdriver.io/docs/gettingstarted).
## Output
This reporter will output a report for each runner, so in turn you will receive an xml report for each spec file. Below
are examples of XML output given different scenarios in the spec file.
### Single describe block
```javascript
describe('a test suite', () => {
it('a test case', function () {
// do something
// assert something
});
});
```
becomes
```xml
```
### Nested describe block
```javascript
describe('a test suite', () => {
describe('a nested test suite', function() {
it('a test case', function () {
// do something
// assert something
});
});
});
```
becomes
```xml
```
### Multiple describe block
```javascript
describe('a test suite', () => {
it('a test case', function () {
// do something
// assert something
});
});
describe('a second test suite', () => {
it('a second test case', function () {
// do something
// assert something
});
});
```
becomes
```xml
```
### Failures and Errors
All test case failures are mapped as JUnit test case errors. A failed test case due to assertion failure or error will look like:
```xml
(C:\repo\webdriver-example\test\specs/a_test_suite.spec.js:22:17)
]]>
```
## Configuration
Following code shows the default wdio test runner configuration. Just add `'junit'` as reporter
to the array. To get some output during the test you can run the [WDIO Dot Reporter](https://github.com/webdriverio/webdriverio/tree/main/packages/wdio-dot-reporter) and the WDIO JUnit Reporter at the same time:
```js
// wdio.conf.js
module.exports = {
// ...
reporters: [
'dot',
['junit', {
outputDir: './',
outputFileFormat: function(options) { // optional
return `results-${options.cid}.${options.capabilities}.xml`
}
}]
],
// ...
};
```
The following options are supported:
### outputDir
Define a directory where your xml files should get stored.
Type: `String`
Required
### outputFileFormat
Define the xml files created after the test execution.
Type: `Object`
Default: ``function (opts) { return `wdio-${this.cid}-${name}-reporter.log` }``
```
outputFileFormat: function (options) {
return 'mycustomfilename.xml';
}
```
> Note: `options.capabilities` is your capabilities object for that runner, so specifying `${options.capabilities}` in your string will return [Object object]. You must specify which properties of capabilities you want in your filename.
### suiteNameFormat
Gives the ability to provide custom regex for formatting test suite name (e.g. in output xml ).
Type: `Regex`,
Default: `/[^a-zA-Z0-9@]+/`
```js
// wdio.conf.js
module.exports = {
// ...
reporters: [
'dot',
['junit', {
outputDir: './',
suiteNameFormat: /[^a-zA-Z0-9@]+/
outputFileFormat: function(options) { // optional
return `results-${options.cid}.${options.capabilities}.xml`
}
}]
],
// ...
};
```
### addFileAttribute
Adds a file attribute to each testcase. This config is primarily for CircleCI. This setting provides richer details but may break on other CI platforms.
Type: `Boolean`,
Default: `false`
### packageName
You can break out packages by an additional level by setting `'packageName'`. For example, if you wanted to iterate over a test suite with different environment variable set:
Type: `String`
Example:
```js
// wdio.conf.js
module.exports = {
// ...
reporters: [
'dot',
['junit', {
outputDir: './',
packageName: process.env.USER_ROLE // chrome.41 - administrator
}]
]
// ...
};
```
### errorOptions
Allows to set various combinations of error notifications inside xml.
Given a Jasmine test like `expect(true).toBe(false, 'my custom message')` you will get this test error:
```
{
matcherName: 'toBe',
message: 'Expected true to be false, \'my custom message\'.',
stack: 'Error: Expected true to be false, \'my custom message\'.\n at UserContext.it (/home/mcelotti/Workspace/WebstormProjects/forcebeatwio/test/marco/prova1.spec.js:3:22)',
passed: false,
expected: [ false, 'my custom message' ],
actual: true
}
```
Therefore you can choose *which* key will be used *where*, see the example below.
Type: `Object`,
Default: `errorOptions: { error: "message" }`
Example:
```js
// wdio.conf.js
module.exports = {
// ...
reporters: [
'dot',
['junit', {
outputDir: './',
errorOptions: {
error: 'message',
failure: 'message',
stacktrace: 'stack'
}
}]
],
// ...
};
```
### addWorkerLogs
Optional parameter, set this parameter to true in order to attach console logs from the test in the reporter.
Type: `Boolean`
Default: `false`
Example:
```js
// wdio.conf.js
module.exports = {
// ...
reporters: [
'dot',
['junit', {
outputDir: './',
addWorkerLogs: true
}]
],
// ...
};
```
## Adding custom properties to testcases
This plugin provides a function `addProperty(name, value)`. This function may be used to add additional junit testcase properties to the currently running test step. These properties will be reported in the resulting xml as ``.
Typical usecase for this is adding a link to an issue or a testcase.
### Usage example
An example for mocha:
```js
import { addProperty } from '@wdio/junit-reporter'
describe('Suite', () => {
it('Case', () => {
addProperty('test_case', 'TC-1234')
})
})
```
## Jenkins Setup
Last but not least you need to tell your CI job (e.g. Jenkins) where it can find the xml file. To do that, add a post-build action to your job that gets executed after the test has run and point Jenkins (or your desired CI system) to your XML test results:
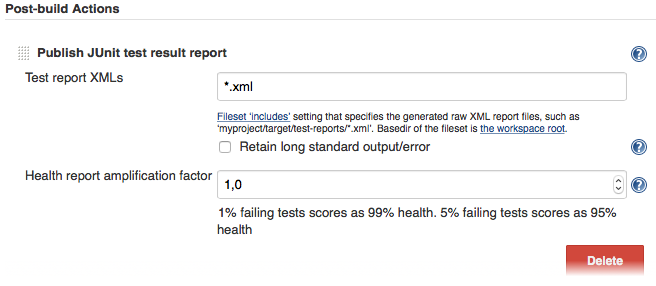
If there is no such post-build step in your CI system there is probably a plugin for that somewhere on the internet.
----
For more information on WebdriverIO see the [homepage](https://webdriver.io).